Image Tools

Line Art to Comic for Finished comic looks from line art

For artists adding color, mood, and finish to line drawings, Line Art to Comic is built to turn clean outlines into comic artwork without burying the drawing. The page focuses on the practical need to translate an existing image into a comic, manga, or webtoon direction without losing the useful structure, so the output can be judged as converted reference with a clear production role.

Line Art to Comic before and after board adding color shadow and comic finish to clean outlines

Góc nhìn thực tế

Line Art to Comic giúp ích ở đâu

Line Art to Comic is strongest when the creator already knows the decision they need to make. Use it for finished comic looks from line art, then judge the result by source fidelity, crop, lighting simplification, stylized edges, and whether the converted image still has a clear subject. That keeps the page grounded in image conversion rather than broad image generation.

The honest limitation is this: color can overpower the line art if the palette has no hierarchy. In practice, the output may copy surface style while losing likeness, pose readability, or the reason the source was useful. Stronger results come from the first decision: choose which parts of the source image must be preserved and which can be stylized. The working constraint is: choose the light source and color mood before adding effects.

Dùng khi

  • Turning clean line drawings into finished comic-style panels or art.
  • Adding color, shadow, texture, and background depth without burying the ink.
  • Creating character art, cover tests, color passes, and panel finishes.

Cẩn thận khi

  • Color passes with no light source or value hierarchy.
  • Effects that overpower the original drawing.

Workflow

A Line Art to Comic workflow that protects the result

The workflow below is specific to Line Art to Comic: define the image conversion decision, set the asset boundary, give visible evidence, then approve only the drafts that can move into a real next step.

1

Audit the source

Start by writing the job in one sentence: turn clean outlines into comic artwork without burying the drawing. For Line Art to Comic, the first decision is to choose which parts of the source image must be preserved and which can be stylized.

2

Pick the conversion goal

Decide whether the output is meant to become color passes, cover tests, character art, and panel finishes. That choice controls crop, detail density, text space, and how much of the scene belongs in one pass.

3

Preserve visible anchors

Describe what the model should make visible: matched pose, simplified forms, controlled texture, clear focal point, and enough blank space for editing. Then add the style language that matters here: flat colors, cel shading, ink preservation, halftone texture, and readable values.

4

Compare style strength

Generate alternatives by changing one variable at a time. For image conversion, useful variables include camera distance, emotion, panel role, source fidelity, line weight, or text hierarchy.

5

Approve source fidelity

Keep a result only when it passes the review focus: source fidelity, crop, lighting simplification, stylized edges, and whether the converted image still has a clear subject. The next move should be obvious: use the converted result as a reference, panel draft, character seed, or style test.

Prompt craft

Prompt pattern for Line Art to Comic

A useful Line Art to Comic prompt begins with the asset you need, not a list of style adjectives. Give the model a visible subject, the production role, and the review focus: source fidelity, crop, lighting simplification, stylized edges, and whether the converted image still has a clear subject.

Reusable formula

Subject + visible change + converted reference role + color passes, cover tests, character art, and panel finishes + flat colors, cel shading, ink preservation, halftone texture, and readable values + review rule: choose the light source and color mood before adding effects.

Weak prompt

color this line art

Stronger prompt

line art of a rooftop hero finished with sunset comic colors, designed for color passes, cover tests, character art, and panel finishes, with flat colors, cel shading, ink preservation, halftone texture, and readable values; make the reader understand that choose the light source and color mood before adding effects; leave clean space for later editing and keep the focal point clear.

Why this works

The stronger version names the subject, the visible change, and the asset role. It also tells the tool what success looks like for image conversion: source fidelity, crop, lighting simplification, stylized edges, and whether the converted image still has a clear subject.

Quality signals

How to judge Line Art to Comic output

Use these checks before spending more time on a result. They are tuned for Line Art to Comic, where the main risk is that the output may copy surface style while losing likeness, pose readability, or the reason the source was useful.

Source match

The viewer should know what to notice first. For this tool, that first read should support choose the light source and color mood before adding effects.

Style transfer

The draft should behave like converted reference with a defined job. Check whether it is actually useful for color passes, cover tests, character art, and panel finishes.

Subject clarity

Leave room for bubbles, captions, crop marks, export UI, or follow-up editing instead of filling every inch with detail.

Edit margin

A repeatable result needs visible anchors: matched pose, simplified forms, controlled texture, clear focal point, and enough blank space for editing. Save those anchors beside the generated draft.

Conversion loss

Look directly for the common failure: the output may copy surface style while losing likeness, pose readability, or the reason the source was useful. If that appears, revise the brief before generating again.

Reference value

A keeper should point to a clear follow-up: use the converted result as a reference, panel draft, character seed, or style test. If it does not, treat it as a mood reference, not production output.

Visual examples

References that fit Line Art to Comic

Line-art examples should be judged by whether finish supports the drawing instead of replacing it.

Line Art to Comic workflow with before and after comic panels

Line to finished panel

A good finish pass keeps the original linework readable while adding color, shadow, and depth.

Digital comic finish reference

Digital finish

Clean color and shadow groups can add polish without hiding the ink.

Comic scene color finish reference

Scene color

A clear light source helps line art become a believable comic scene.

Creator field guide

How experienced creators use Line Art to Comic

These notes are the practical layer behind the generator. They help creators decide what to ask for, what to ignore, and when a draft is ready to move into a larger ComicsAI workflow.

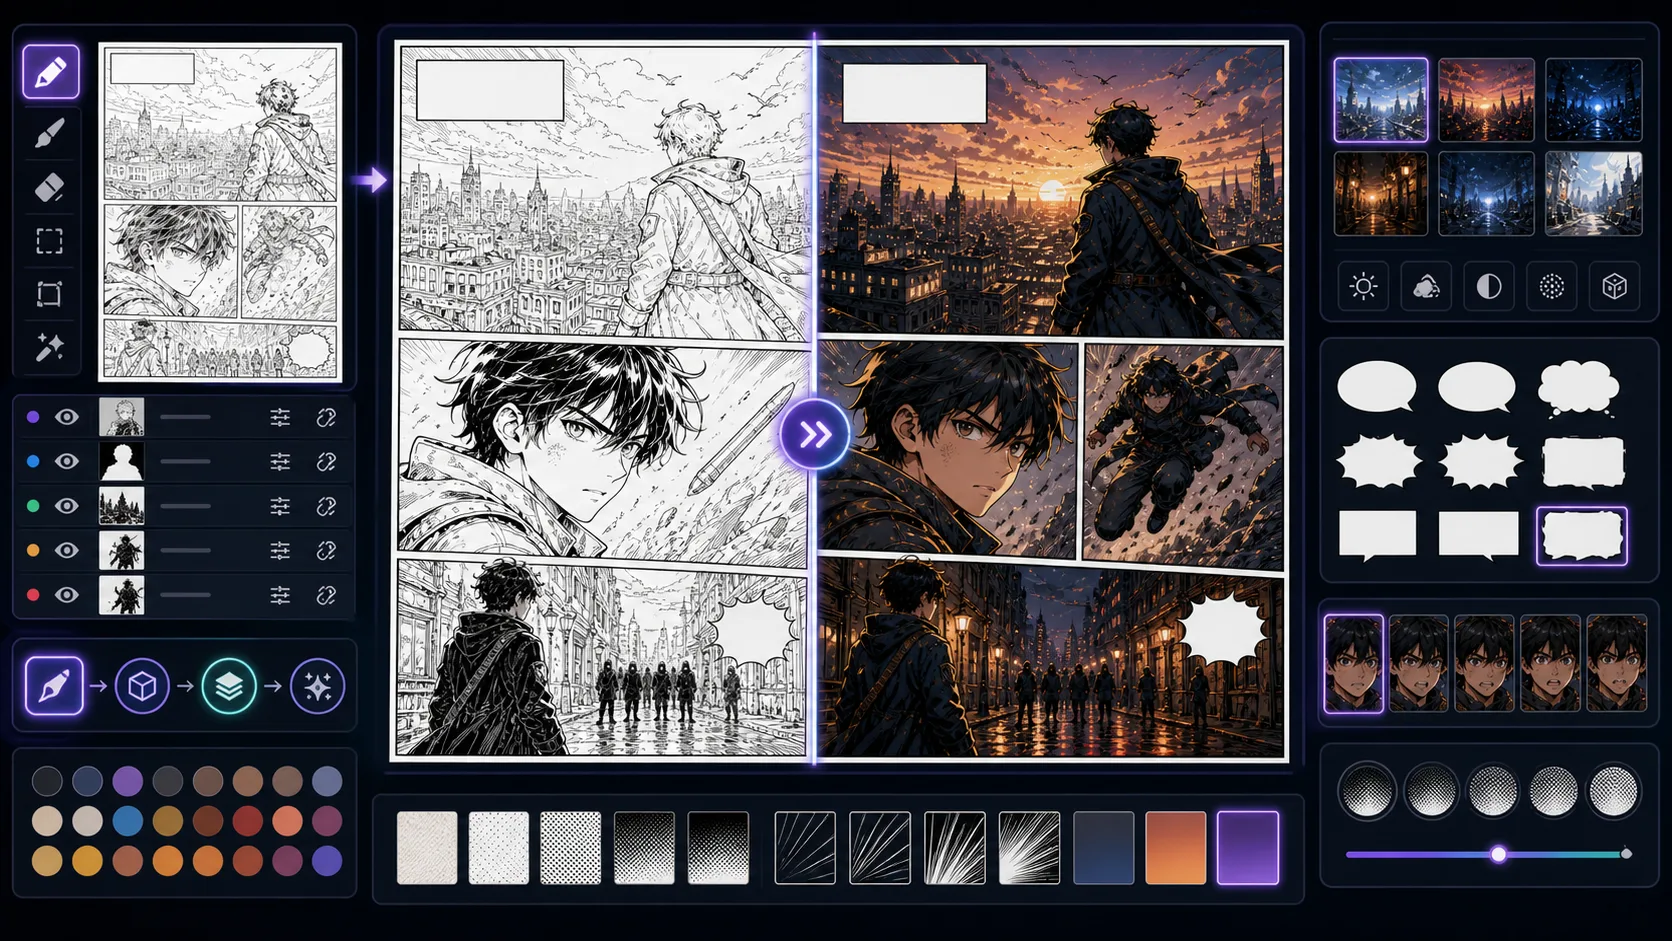
Brief Line Art to Comic around one deliverable

Do not ask for a whole project in one prompt. Ask for converted reference that helps artists adding color, mood, and finish to line drawings. A good brief names the deliverable, the visible subject, the emotional change, and the format. For this page, "line art of a rooftop hero finished with sunset comic colors" is more useful when it is tied to color passes, cover tests, character art, and panel finishes and a concrete review rule: choose the light source and color mood before adding effects.

Protect the image conversion decision

Every tool here has a different creative pressure. In Line Art to Comic, the pressure is translate an existing image into a comic, manga, or webtoon direction without losing the useful structure. That means the prompt should prioritize source fidelity, crop, lighting simplification, stylized edges, and whether the converted image still has a clear subject before extra polish. A beautiful result is still weak if it fails the decision the page was built to make.

Turn invisible story into visible signals

Backstory, mood, and theme only help when they change something the reader can see. Translate hidden ideas into posture, crop, lighting, props, wording, panel height, or negative space. This protects the tool from the common failure where the output may copy surface style while losing likeness, pose readability, or the reason the source was useful.

Compare versions with one test rule

Use the same test prompt when comparing styles or settings. Change only one thing at a time, then judge against choose the light source and color mood before adding effects. This makes the result easier to discuss with collaborators because the debate moves from taste to observable evidence.

Document the useful part

When a result works, write down why. Note the prompt phrase, the crop, the style detail, and the limitation. For Line Art to Comic, the useful part is usually not the whole image; it may be the silhouette, the line break, the scroll timing, the character anchor, or the panel role.

Stop when the draft has a job

The goal is not endless regeneration. Stop when the output can become the next asset in the chain: use the converted result as a reference, panel draft, character seed, or style test. That habit keeps the tool connected to real comic production instead of turning the page into a gallery of unrelated experiments.

Field notes

Production notes for Line Art to Comic

Line Art to Comic should treat the drawing as the structure. Color, shadow, effects, and background depth should support the ink rather than bury it. If the original outline becomes hard to read, the finish pass has failed even if the image looks more detailed.

The page should encourage a lighting decision before color. A clear light source and palette role make the finish believable: warm sunset cover, cold night panel, flat webcomic color, or dramatic superhero shadows. This turns a basic coloring request into a production workflow.

Useful Line Art to Comic scenarios

Color pass

Turn line art into a shareable comic image with controlled palette.

Panel finish

Add shadow and background treatment after the drawing is approved.

Common Line Art to Comic mistakes

Burying the ink

The line art should remain the structure of the final image.

No lighting plan

Color and shadow need a clear source before effects are added.

Where to go next

After finishing line art, continue with manga colorizing, image-to-comic, captions, or panel layout.

Câu hỏi của creator

What is Line Art to Comic?

Line Art to Comic is a ComicsAI tool for finished comic looks from line art. It is built around turn clean outlines into comic artwork without burying the drawing, with a practical focus on translate an existing image into a comic, manga, or webtoon direction without losing the useful structure.

How do I get better line art to comic results?

Start with the production role, then describe visible evidence: matched pose, simplified forms, controlled texture, clear focal point, and enough blank space for editing. Add flat colors, cel shading, ink preservation, halftone texture, and readable values, and review the result for source fidelity, crop, lighting simplification, stylized edges, and whether the converted image still has a clear subject.

What should I check before keeping a Line Art to Comic result?

Check whether the result supports choose the light source and color mood before adding effects. Also look for the main failure mode: the output may copy surface style while losing likeness, pose readability, or the reason the source was useful.

Should the prompt be long or short?

Focused is better than long. Include details only when they change converted reference: crop, voice, pose, line breaks, source fidelity, panel role, or layout space.

How does this fit with the rest of ComicsAI?

Use Line Art to Comic for image conversion, then continue with related tools such as Sketch to Comic, Manga Colorizer, Image to Comic when the project needs the next draft, edit, reference, or release step.