Do not lead with filter novelty
Filter-style wording can be useful, but the workflow should explain why source-aware conversion matters more for creators than a one-click style effect.
Image Tools
Turn a photo into comic art while preserving the useful structure of the original image: pose, face angle, lighting, outfit, room layout, or object placement. this workflow is for source-aware comic conversion, not a blind filter.
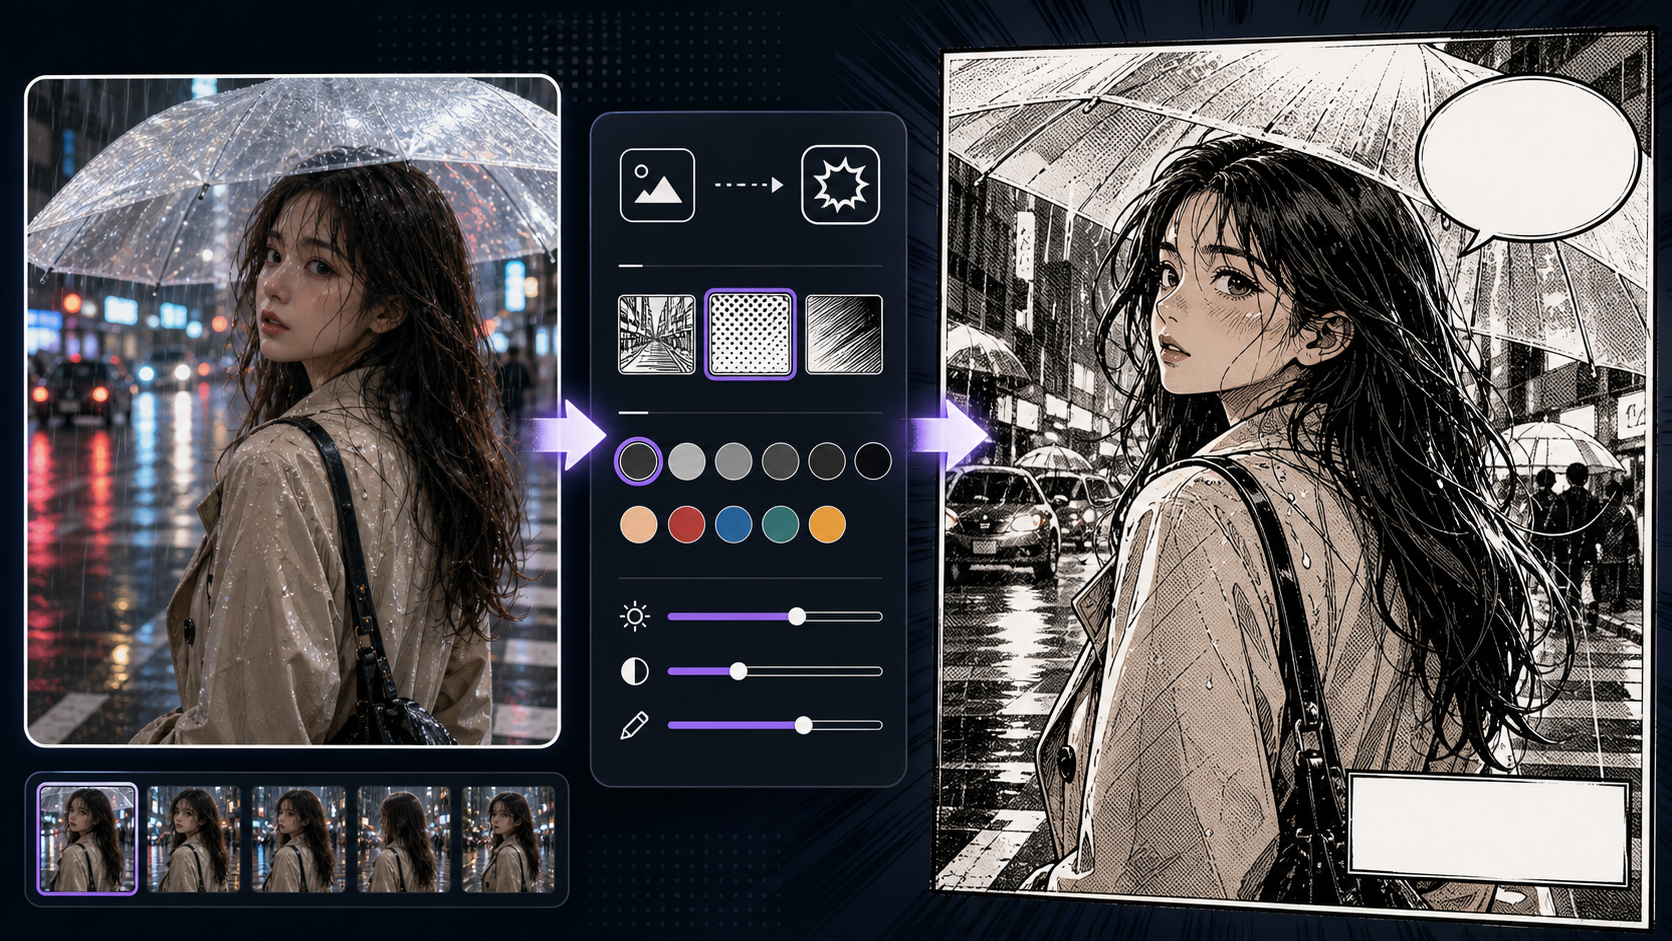
Upload a reference photo, choose a compact comic style, and export a finished result without leaving the page.
Generate to create a result
The output image is not shown here until a generation finishes.
Practical take
Use Photo to Comic when the photo already contains something worth keeping. A good conversion protects the pose, face angle, lighting, outfit, room layout, or focal object, then simplifies texture into comic line, color, shadow, and panel-ready composition.
The product challenge is expectation split. A quick comic filter can be playful, while photo to comic and image to comic users expect a useful conversion. The workflow should cover filter-style results without becoming only a novelty effect.
Workflow
Start by auditing the source photo. Decide what must stay recognizable, then choose the comic treatment and panel role.
Choose the source anchors: pose, face angle, expression, outfit, prop, lighting, room layout, or street perspective.
Pick graphic novel, clean webcomic, bold ink, noir, superhero, or Sunday strip based on how the result will be used.
Ask the conversion to simplify clutter, texture, reflections, and accidental background objects into readable comic shapes.
If the result will become a panel, leave clean zones for captions, speech bubbles, crop, or later editing.
Keep the result only if the comic version still preserves the reason the source photo was chosen.
Prompt craft
A strong Photo to Comic prompt starts with preservation rules before style. Tell the tool which parts of the photo matter, then describe the comic look, panel role, and cleanup rules.
Source photo + preserve anchors + comic style + panel role + text-safe space + cleanup rule.
turn photo into comic
Turn this photo into a graphic novel comic panel while preserving the seated pose, warm window light, red jacket, and face angle. Simplify background clutter into inked shapes, keep the subject recognizable, leave clean upper-right space for a caption, and avoid random text.
The stronger prompt covers photo to comic and comic filter intent without losing production value. It tells the tool what to preserve, how to stylize, and how the result will be used.
Quality signals
A useful photo-to-comic conversion balances source fidelity and comic readability. It should not become a flat filter or an unrelated drawing.
The pose, face angle, outfit, lighting, or room layout that mattered in the photo should remain recognizable.
Photo texture should become cleaner line, color, shadow groups, and readable edges instead of noisy detail.
The converted image should have a clear focal point, usable crop, and space for captions or speech bubbles.
If the requested style is comic filter, the result still needs control over likeness, clutter, contrast, and edit space.
Visual examples
Photo conversion examples should be judged by source fidelity, comic simplification, filter control, and panel usefulness.

The best photo-to-comic result preserves pose, expression, and lighting while simplifying detail into panel-ready comic language.

Filter strength, ink edges, and color simplification should support likeness and composition rather than flattening the image.

A converted photo becomes more useful when it keeps a clear focal point and clean space for captions or speech bubbles.
Creator field guide
These notes help creators decide what to plan, what to ignore, and when a draft is ready for the next production step.
Filter-style wording can be useful, but the workflow should explain why source-aware conversion matters more for creators than a one-click style effect.
Portraits need likeness cues, expression, and clothing anchors. Locations need perspective, lighting, and simplified clutter. Treat them as different conversion jobs.
A converted photo can become a panel draft, character pose reference, location study, cover base, or style test only if it keeps crop and text space in mind.
Field notes
Photo to Comic should be framed as reference transformation rather than a novelty filter. A user uploads or selects a photo because it already contains something useful: a pose, location, costume, facial angle, product scene, or lighting idea. The workflow should teach users to protect that value during conversion.
The conversion process should simplify real-world detail into comic-readable shapes. Photos contain texture, noise, accidental objects, and lighting complexity. Comic art often needs cleaner silhouettes, grouped shadows, stronger edges, and fewer background distractions. That is where the tool becomes more useful than a basic filter.
A practical review question is whether the result can become part of a comic workflow. Can it be cropped as a panel? Can captions or bubbles be added? Does the subject remain readable after stylization? If not, the output may be fun but not production-ready.
Different photo types need different expectations. A portrait conversion should protect likeness cues and expression. A room photo should protect perspective and furniture layout. A street photo should simplify signage, crowds, and texture into usable atmosphere. Calling out these distinctions helps the workflow feel grounded in real creator use rather than promising that every upload becomes finished comic art.
Preserve face angle, expression, hair, and outfit cues while translating the portrait into comic art.
Turn a real room, storefront, street, or desk setup into a simplified comic scene.
Use the converted image as a panel candidate with crop and lettering space already considered.
Compare comic filter treatments before committing a whole project to one visual language.
The result fails if it loses the pose, face angle, or composition that mattered.
Converted photos often need cleaner zones for captions or bubbles.
Portraits, rooms, products, and street photos each need different preservation rules.
After conversion, continue with image-to-comic edits, captions, panel generation, photo-to-manga, or character reference work.
Photos with a clear subject, readable pose, simple lighting, and visible source anchors convert better than blurry, crowded, or heavily compressed images.
No. It can cover comic filter intent, but the better workflow is source-aware conversion: preserve the useful parts of the photo, simplify the rest into comic language, and review the result as a panel or reference.
Yes, especially when you reserve text space and review the crop, focal point, source fidelity, and panel role before adding captions or speech bubbles.
Specify the source details that should stay: pose, face angle, expression, clothing, prop, lighting, or background layout.
Photo to Comic focuses on real photos and likeness cues. Image to Comic can also start from sketches, screenshots, renders, or artwork, so it needs broader source diagnosis.